This is a journal I will be keeping to document my experiences, both successful and unsuccessful, in beekeeping. This will be my first year, 2011, keeping bees. We'll see how it goes. I will be keeping bees naturally, letting them build on foundationless frames, and without medication. This is also my first blog I have ever done and I am by no means a journalist or English major. So, if you see grammatical errors of any and all kinds don't be surprised. The looks of things on the blog will probably change several times before I come up with something that I like.

Wednesday, February 23, 2011

Top Bars for Swarm Traps

After building all my swarm traps, I knew that I needed some frames to go into them.  I wanted to use frames in my swarm traps so the bees don't actually build comb on the roof of the trap, but rather on the frame.  Frames, even though they are .75 cents a piece from my local dealer, are not that cheap when you start adding them up.  .75 each x 5 per trap x 15 traps, a grand total of $56.25.  This is not what I want to spend considering I still have to buy and build 100 of them for my hives.

While cleaning out our warehouse at work I found a pallet that needed to be thrown away.  I knew I could use this for something.  I started brainstorming and realized that I could make top bars for my swarm traps, instead of frames, out of it. 

The top bars needed to be 19" long, so I measured in between the 2x4's and there was more than enough.  I did this because I didn't want the nail hole from the 2x4's going through the middle of my top bars. The planks on top were 3/4" thick, exactly the thickness of the top bar.   This would work perfectly.

I grabbed the pallet, put it in the back of the pickup, and brought it home to be put to good use later.

I went to Beesource to find some plans for top bars.  I knew they didn't have plans for the top bars for Top Bar Hives, but they did have them for the frames.  All I needed was the dimensions of the top bar section of the frame. 

So, I set out this evening, after work, working on the tablesaw outside.  It was a beautiful day and it really made me anxious to get these hive started.  I started by running the skil saw on either side of the 2x4's, then cut them to length, and started ripping them on the table saw to get the individual bars.  After several passes on the table saw, to get the bars the shape that I wanted, this is what I came out with.
I made a couple of cuts down the center of the bar, to give me 3/16" space to add a piece of corrugated plastic for the starter strip. 

Cut the starter strip, from some old political signs.  I used some more of the cigarette signs I had left over from building the swarm traps.

Insert the starter strip into the top bar.

Secure the starter strip in place with nails, to keep the strip from falling out after comb has been built on it.  I used three, one on either side and one in the middle. 

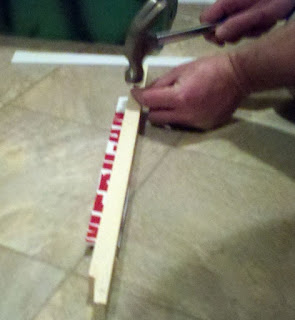
The next step I did was to nail a couple nails on either end, on the same side, of the bar.  This will act as a spacer for the following  top bar to be placed.  These nails are set and left  protruding out 1/4".  This isn't normally needed because the side bars have the 1/4" spacers built in but since mine are tops only I went ahead and put them on so beespace wouldn't be compromised.   This was not my idea, but yet another trick I got from Rob Overton's site.  He actually uses staples on his complete frames.

Clicking on this will show you better the two "spacer nails" on either end.
And here they are all in place in the swarm trap.  You can see the "spacer nails" working.
Plenty more to be working on. Actually, I only cut half of one side of the pallet.  The pallet will go a long way which is needed because I have 75 bars to build.

This, surprisingly, didn't take very long to do.  I got home at 4:00 today and was finished with all the cutting by 6:30.  It was a fun project, but not something that should be done by someone with less than average carpentry skills.  There is just a lot of tedious cuts involved on a table saw which can be dangerous when your doing something this repetitive.

I hope you enjoyed reading this.  It was fun building them and fun to tell you about the experience.
James

Saturday, February 19, 2011

Swarm Traps are Built

While I don't have much to do, (as far as beekeeping goes) waiting on spring to get here.  I decided to try and build some swarm traps to put out this spring.  This will give me some extra bees if the opportunity presents itself.  And it is an opportunity to do some more woodworking.  Which I love to do.

I search the net trying to find some plans for the traps.  I found several styles including the five gallon bucket style, the concrete form tube style, and many others.  As I said earlier, I like to work with wood so I wanted a style that you could build out of wood. 

I found what I was looking for on Rob Overtons site.  By the way, he has a great site for beekeeping stuff.  With his trap, all that needed is:
  • 2 4x8x3/8" plywood
  • 1 4x8x1/4" Luan
  • glue
  • nails
  • corrugated plastic signs  (politcal signs)

This is the all the plywood and Luan after all the cuts had been made.  The left stack is the tops.  Middle stack is the sides.  And the right stack is the front and backs.  The bottoms are made from corrugated plastic. (like the political sign)  These can be picked up free during certain times of certain years.  I have a brother in law and cousin who works with a wholesale tobacco company and was able to get some tobacco advertising signs (which are the exact same thing) that they were going to throw away.

My little helper always pitching in a hand. 


This picture is showing how you would actually remove the top cover to access the swarm inside.  I used staples here so the top could be removed easily with a hive tool.
The completed traps.  The top left one has already been painted.  I just spray painted it with some black and green that I had laying around.  I don't want them to be noticeable when they are actually up in a tree.  You know how teenagers can be so mischievous. 


These plans will make a total of 15 traps.  I suppose I'll have to make a list of where all these traps get installed so as not to lose them.  I have what I call "some-timers" and will likely forget where I put some of them.

Total spent on the plywood and Luan was about $33.00 + tax.  I already had the glue and nails.  So these traps were built for around $2.20 a piece.  Not bad considering the fiber swarm traps you can buy from the catalogs are in the $20-$30 range, each.  The traps I built will hold the frames in them too.  So all you would have to do is remove the frames and place them in the hive if they started building comb before you could get to taking them down. 

I asked a couple of questions on Beemaster concerning the lure to attract swarms.  What I have decided to do is to dab some lemongrass oil on a ball of cotton and place it in a pill bottle.  The lid of the bottle will have some very small holes drilled in the top.  This will be attached to the trap somehow. 

Here is the album of the pictures taken while building these traps. 
Building the Swarm Traps
If I was to do this over again I would probably use a thicker plywood.  Say around 1/2" or so.  The reason being is that several times, when nailing  the sides and front together, the nail would come out the side because the plywood was so thin.  That may could have been remedied by predrilling each hole, but these are just swarm traps, I wasn't building a piano.  It's not likely that the bees will care either.